
Who is this Guide For?
- All Users
What You’ll Learn
- How to navigate the Conversations page
- How to start, archive, delete, and export conversations
- How opt-in status and consent message status affect messaging and automations
- How to use key conversation tools (MMS, canned responses, drip campaigns)
Overview
The Conversations page is where you will spend most of your time communicating with your contacts. It includes your active conversation list, conversation history, contact indicators (like opt-in/consent status), and tools for managing and exporting messages.
Conversations Screen
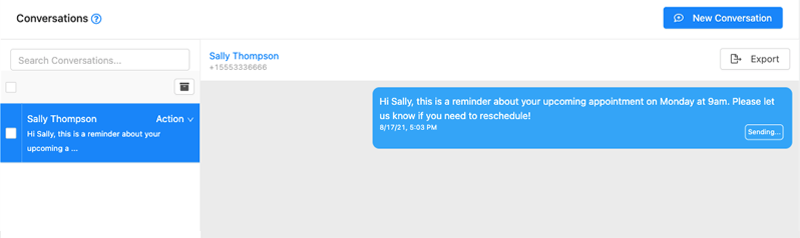
Active conversations appear in a list on the left. Select any conversation to view it on the right.
Message Types in a Conversation
When viewing an active conversation, you may see three types of messages:
Inbound
- Left aligned
- Grey background
Outbound
- Right aligned
- Blue background
Notes
Notes can be entered into a conversation via the API and are meant to provide context, such as voicemail transcriptions or notes from a CRM / e-commerce system.
Note: Notes may not be available or enabled on every account type.
Opt-In Status
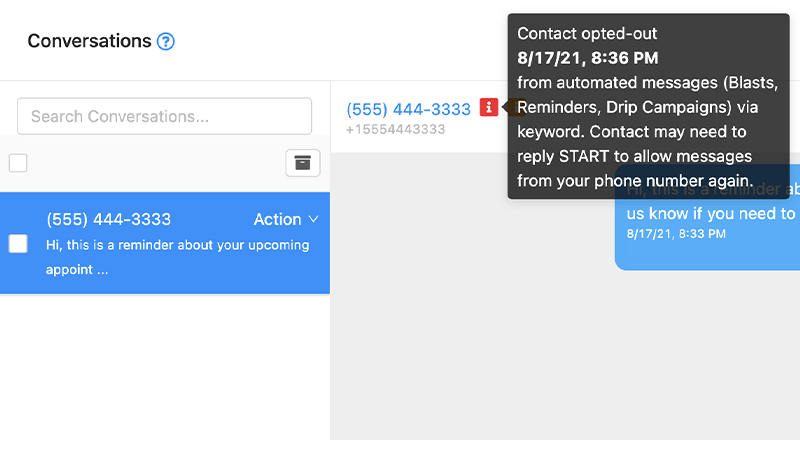
Each contact has an opt-in status that defaults to Opted-in. Opt-in status controls whether you can use automated features for that contact, including (but not limited to):
- Blasts & Contact Lists
- Drip Campaigns
- Reminders
Keywords That Opt a Contact Out
A contact becomes opted-out when any of the following keywords are received:
- STOP
- END
- QUIT
- CANCEL
- UNSUBSCRIBE
- OPTOUT
Keywords That Opt a Contact In
A contact becomes opted-in when any of the following keywords are received:
- START
- UNSTOP
- SUBSCRIBE
- OPTIN
Important: Depending on your carrier, you may still be able to send transactional and conversational (non-automated) texts to an opted-out contact. However, an opt-out keyword may trigger a carrier-level block and messages may not be delivered.
Manually Opt-Out a Contact
- Open the contact’s Contact Details page.
- Check the Opted out checkbox.
- Click Update Contact Details.
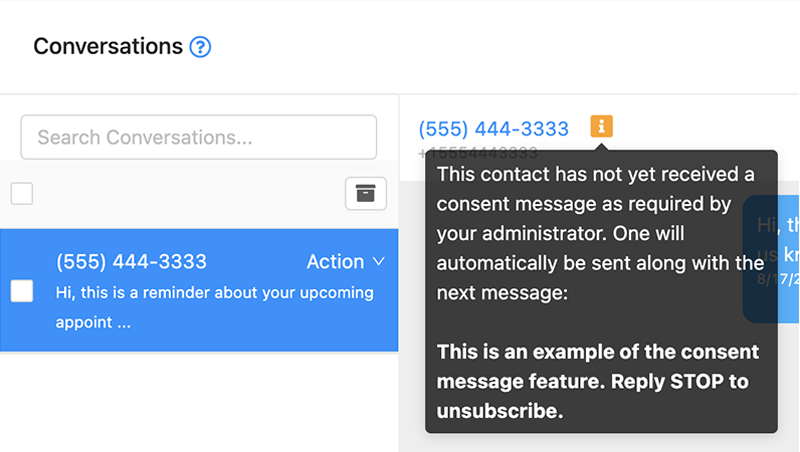
Consent Message Status
A consent message generally identifies the sender, informs the recipient you intend to communicate via text messaging, and provides an opt-out option (for example: “Reply STOP to unsubscribe.”).
Some organizations enable a consent message requirement at the Organization level. When enabled, a contact’s consent message status displays next to the contact name in the active conversation view.
What Happens When Messaging a New Contact
- If the contact is new (or has not yet received the consent message), your intended message will be preceded by a consent message.
- After the consent message is sent, the contact’s consent status will appear as an indicator in contact details and conversation views.
Starting a New Conversation
- Click New Conversation in the top-right of the app.
- Choose one of the options below to start messaging.
Send to Phone Number
- Enter the number into the Send to Phone Number: field.
- Click Start Conversation.
Choose Contact
- Search or scroll through your address book.
- Click the contact to start a conversation.
Archiving Conversations
Archiving inactive conversations helps maintain the best performance and user experience. When a conversation is archived, message history is retained, but the conversation is hidden from the active list.
Note: There is not currently a way to view all archived conversations. However, archived conversations will appear in search results.
Archive Conversations in Bulk
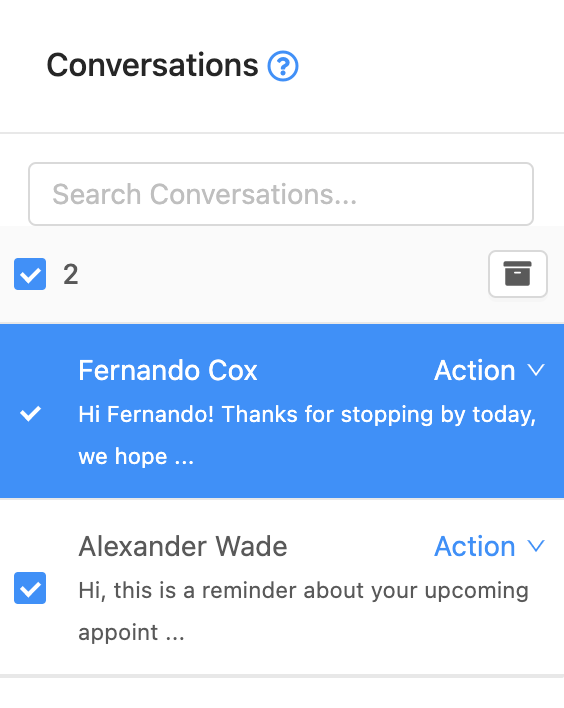
- Select the checkbox next to each conversation you want to archive.
- Or use the top checkbox to toggle selecting all conversations in the list.
- Click the Archive button at the top-right of the conversation list.
Archive an Individual Conversation
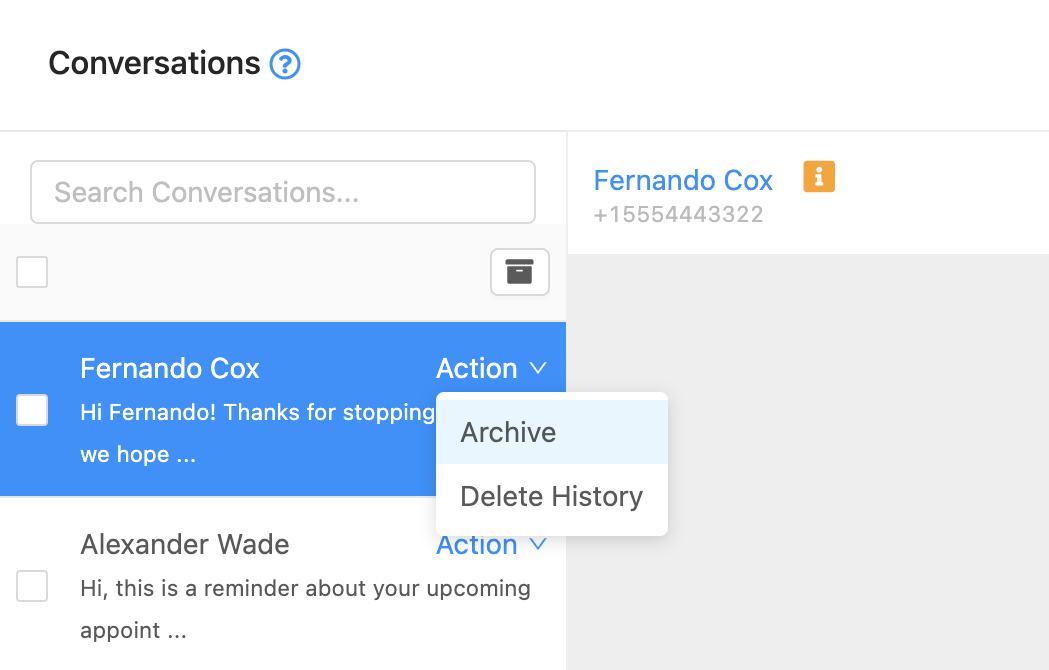
- Open the conversation.
- Select the Action dropdown.
- Choose Archive.
Deleting an Individual Conversation
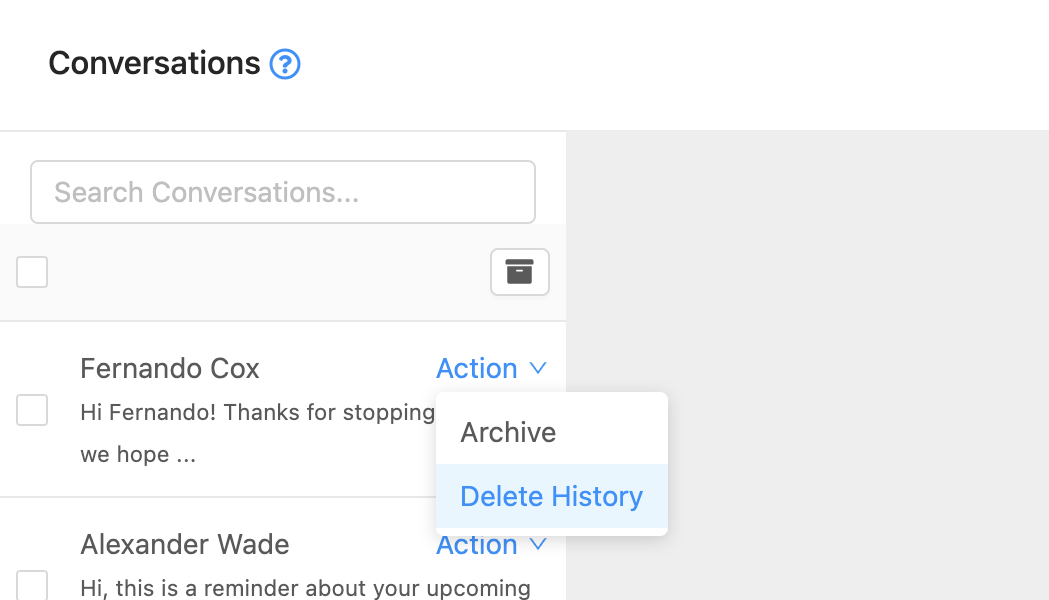
- Open the conversation.
- Select the Action dropdown.
- Choose Delete.
- Confirm deletion when prompted.
Important: Deleting removes all messages in the conversation and is NOT reversible.
Notice: Some users and account types may have the delete option disabled by an administrator.
Conversation Features
Export Message History
You can export message history from an individual conversation using Export Messages.
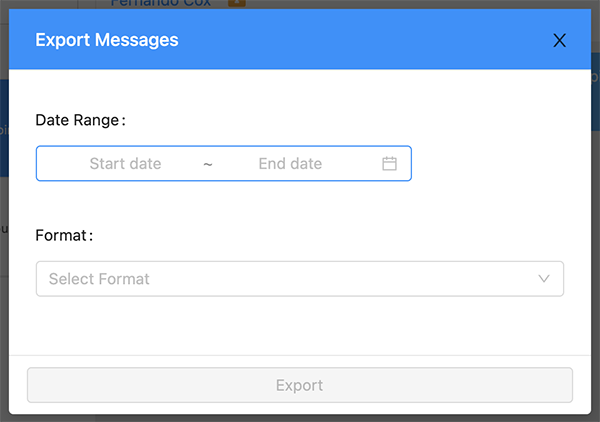
- Click Export to open the export options modal.
- Choose a start and end date.
- Select an export format: CSV or HTML.
- Click Export to begin the export.
Note: Start and end dates must be within 7 days of each other.
Depending on the number of messages, the export process can take up to 30 seconds. A download prompt will appear when complete.
Send MMS
You can send and receive MMS messages. MMS is currently limited to pictures and video in this app. File support may improve in a future update, and MMS support varies by carrier.
- In the message composer, click the camera icon.
- Select a picture or video to attach.
- Send your message.
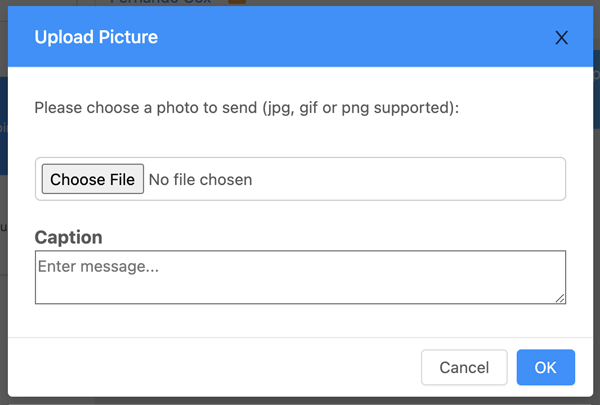
Note: Keep MMS files under 1.5MB to reduce the risk of carrier filtering.
Send a Canned Response
Canned responses are pre-written messages you can use for common replies, Away Messages, and keyword automations.
- In the message composer, click the double arrow icon to open the canned response selection modal.
- Select a canned response to prepopulate the message field.
- Edit the message if needed.
- Click Send (or press Shift + Enter while focused in the message field).
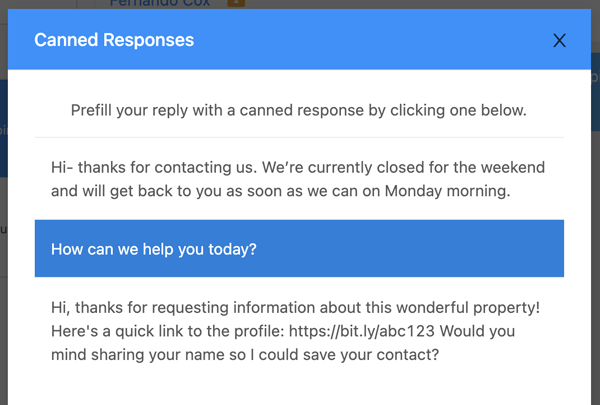
Note: Canned responses are not automatically sent after selection, so you can review and edit before sending.
Apply a Drip Campaign
Drip campaigns are scheduled message sequences designed to engage contacts over time. When applied, messages are scheduled consecutively based on the campaign’s configured intervals.
Example Scheduling
- Drip 1 interval: 1 day → sends 1 day from now
- Drip 2 interval: 3 days → sends 3 days from now
- Drip 3 interval: 5 days → sends 5 days from now
Drip messages continue until the contact replies. If a reply is received before scheduled messages send, any unsent drip messages are automatically deleted.
- In the message composer area, click the water droplet icon to open the drip campaign modal.
- Select a campaign to view its preview.
- Click Apply Campaign to start the sequence.
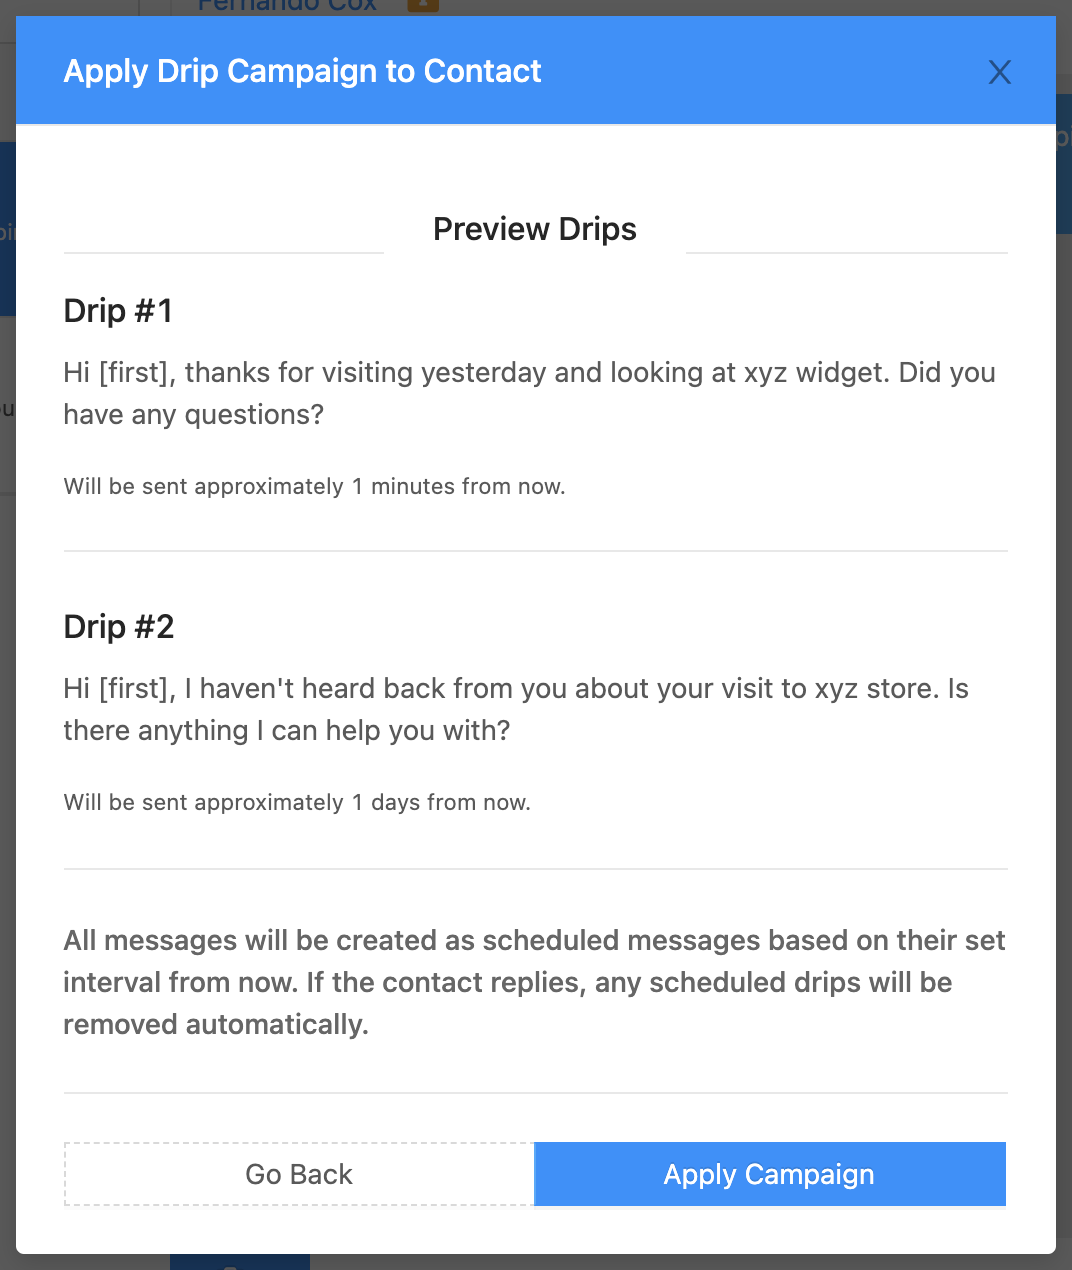
Note: Drip campaigns may not be enabled for every account type, and they will be disabled for contacts that are opted-out from marketing and automations.
Troubleshooting
I can’t send automations (drips, blasts, reminders) to a contact.
- Check the contact’s opt-in status in Contact Details.
- If the contact is opted-out, automated features will be disabled for that contact.
- If appropriate, ask the contact to text START to opt back in.
My message didn’t deliver after the contact opted out.
- Carrier-level blocks may prevent delivery after an opt-out keyword is received.
- Try sending only essential transactional messages if allowed by your carrier policy.
- If delivery failures continue, contact Crexendo Support for guidance.
I don’t see the Delete option.
- Your administrator may have disabled deleting for your user/account type.
- Use Archive instead to hide inactive conversations while retaining history.
FAQ
What happens when I archive a conversation?
Archiving keeps all message history but hides the conversation from your active conversation list. Archived conversations can still appear in search results.
Can I recover deleted messages?
No. Deleting a conversation removes all messages and is not reversible.
Why do I see a consent message before my message to a new contact?
If your organization requires consent messaging, a consent message is automatically sent before your first message to a new contact (or a contact who has not yet received it) so the recipient can acknowledge or opt out.
Need More Help?
If you need additional assistance, please contact Crexendo Support at 855-211-2255 or email us at support@crexendo.com — our team is happy to help!